CLEANING
UP THE DESKTOP VIA USE OF THE START BUTTON
CLEANING UP THE DESKTOP VIA USE OF THE START BUTTON
(Graphics are all at the bottom of the text)
INTRODUCTION
For many years my strategy for loading applications
quickly was to have the shortcut icons for all my frequently used apps
on the desktop. Using an algorithm initially developed by the
Whereizit? cult I arranged the dozens of icons into visual clusters to
enable the one I wanted to be found "quickly". Three problems
with that: (a) occasionally some application or computer problem
rearranged the locations of all the icons, (b) I lost track of where
things were as the number of icons increased, (c) finding an icon when
there is a visitor watching becomes very difficult!
Some C&C folk are using Freelaunchbar (see
http://www.freelaunchbar.com/) to move icons off their desktops.
That application enables you to shift icons from the desktop into
pop-up menu clusters accessed via the quick launch bar. I
understand that this app is a little tricky to configure (although
having worked out how to do it, "it's easy", they say. Like
quantum mechanics, I guess.) An alternative worth looking at was
mentioned by someone (maybe the Silicon Kid) way back. I've been
using it for some years, and it works very well. It does not
require any application to drive it, uses Windows Explorer for
implementation, can be modified easily, and the configuration does not
ever get rearranged without you doing it yourself.
NET RESULT OF SETTING UP THE SYSTEM
The end result for me is a very clean desktop. I
still launch a few apps that I use very often with one click on icons
in the quick launch bar (PowerDeskPro, Internet Explorer, Firefox,
Outlook Express, Process Explorer, TCPView, DUmeter). I access
all my other often-used apps through the Start button (on the lower
left corner of the desktop).
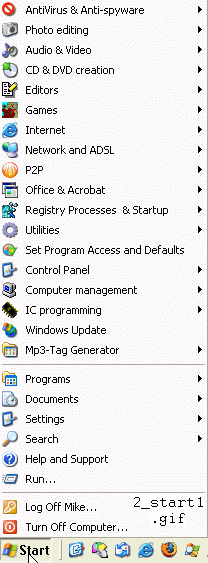
An initial left click on the Start button pops up a panel
containing the usual items that Microsoft stuck under the Start
button. But in addition, the items displayed now include ones
that I have added (see 2_start1.gif). For instance, I have added
an icon and label for "Audio & Video" apps - the 3rd item from the
top in the pop-up panel. The black triangle to the right of any
icon indicates that there is a sub-group of other items under it.
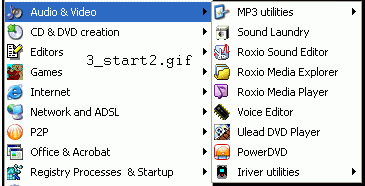
Moving the mouse pointer onto a label which has a triangle pops up the
next level of items in that sub-group. For example, for the Audio
& Video apps item, there are 9 items, one of which is "MP3
utilities" (see 3_start2.gif). Again, moving the mouse pointer
onto an item which has a triangle pops up the next level of apps under
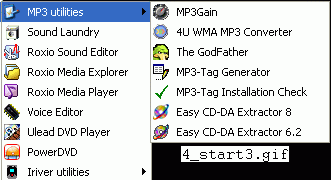
that item. For my MP3 utilities item, there are 7 sub-items (see
4_start3.gif). None of these 7 items have triangles - they are
all are shortcuts to applications, so that a single click on any one of
them loads the app. Most folk would probably only need one or two
levels of popups. Three levels would be required only if you
access a lot of apps regularly. More than three levels would
hardly ever be required and is counter-productive because getting
across to the last level is a long trip.
Most people would have used such a Start button process
system for running programs accessed through the Programs item.
However, when you invoke the programs item you will end up with a very
large list of folders and shortcuts, arranged in an order that is not
as helpful as it might be, and including just about every application
that is installed on the PC. The system I have described set up
just my most frequently used applications, in a tree structure of popup
panels that reflects conceptual grouping that mean that I can quickly
locate the application I want to load. The tree structure and the
items in the popups are ordered the way that I want, and all the items
in the popups have a meaningful icon attached. In XP icons can be
attached to any or all items. In Win 98 (and presumably other
non-NT systems), there is less flexibility for attaching icons.
Determining the content of the popups, the nesting of
popups, and attaching icons is easy (when you know how). The
process for XP is as follows; for other operating systems, the process
is very similar albeit not identical.
SET UP FOLDERS AND SHORTCUTS IN THE START MENU FOLDER
For the method to work, first of all you need to set the
Properties of the Start button so that left clicking it will show the
so-called "Classic menu" instead of the XP style menu. To do
that, right click the Start button, select Properties, and on the Start
Menu tab, select Classic Start Menu, then Apply.
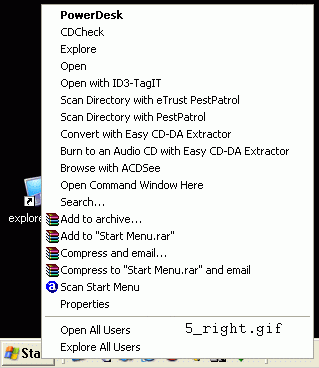
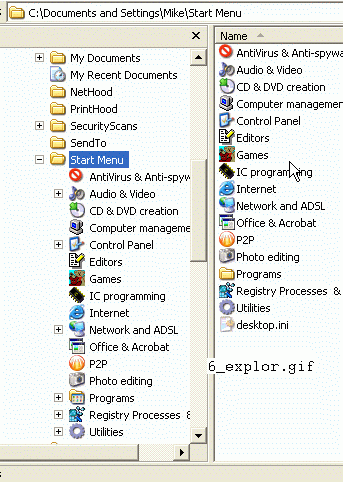
Having done that, exit to the desktop, then right click
the Start button and click on "Explore" (3rd item from the top - see
5_right.gif). The "Start Menu" folder should then appear in
Windows Explorer (see 6_explor.gif).
Within the Start Menu folder, create any new folders
which you would like to see popup at the first level when you left
click on the Start button. In the example shown in 2_start1.gif,
you can see I have added items for Antivirus & Anti-spyware, Photo
editing, Audio & Video, etc. Create such folders through the
Explorer's File/New/Folder menu item. Then if you want them,
create sub-folders within those folders, and sub-sub-folders to reflect
the way you want to locate your apps in 2nd or 3rd or other
levels.
If you want a shortcut to a single application (rather
than a folder) to appear in the first level of popups, put a shortcut
to that app in the Start Menu folder, not within a sub-folder.
Then in the relevant folders and sub-folders, and
sub-sub-folders, insert the relevant shortcuts to your individual
apps. The easiest way to put a shortcut to an app into a folder
is to drag it off the desktop (or copy it and paste it into the folder
if you are still not sure that you want to delete the shortcut from
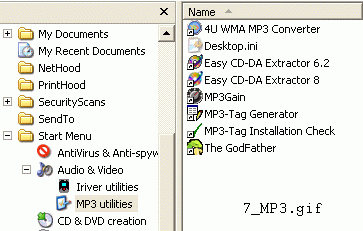
your desktop). See 7_MP3.gif for how my folder \Start Menu\Audio
& Video\MP3 Utilities\ contains shortcuts to 7 apps, one of which
is MP3Gain.
Probably all your shortcuts will already have appropriate
icons, generated when the app was first installed. However,
folders will not have an appropriate icon yet. For folders,
attach icons this way: Right click the folder, click Properties, click
Customize, click Change Icon. Then select an appropriate icon by
browsing icon collections and picking one, or you can select any
application's executable file to get its icon and attach it to the
folder as its icon.
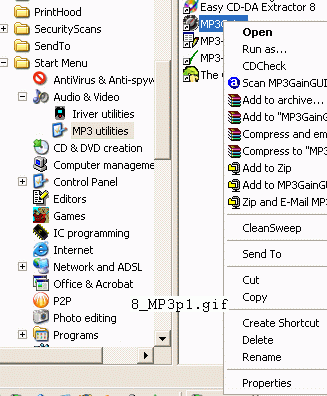
For individual apps, if there is not an appropriate icon
attached or you want to attach a different icon, then attach one this
way: Right click the app, click Properties, click Change Icon, then
select an appropriate icon by browsing icon collections, or selecting
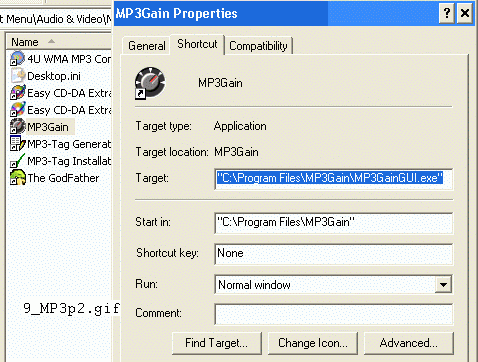
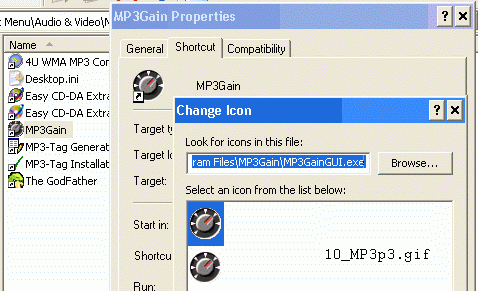
an application's executable file to get its icon. (See
8_MP3p1.gif, 9_MP3p2.gif and 10_MP3p3.gif).
Now exit Windows Explorer.
FIXING THE ORDER OF ITEMS IN THE POPUPS
If you left click the Start button, you should get the
1st level of popup panel, which should now include the folders and
shortcuts to apps you have added. You can change their order by a
left click drag and drop.
If you have included folders (marked by black triangles),
moving the mouse pointer over the folder should popup the next
level. Again, a left click drag and drop can be used to change
the order of items in the popup.
The ordering you have set up will persist until you
change it. (Note that the ordering shown in the Start Menu's
folders visible in Windows Explorer will not be the same, so do not be
concerned about that.)
RUNNING AN APPLICATION
Once you have located within an appropriate popup panel
the shortcut for the application you want to run, left click it and it
will run.
One advantage that the Freelaunchbar application has over
this system is that (I understand) you can drag and drop a file onto
the launch bar's icon and it will run. While that is neat, it
would not be a major advantage for me.
I have not experienced any problems or instability with
this system.
Mike Boesen
3 March 2005
Index
Next
