
Author: Mike Boesen
Last updated: 15 October 2005
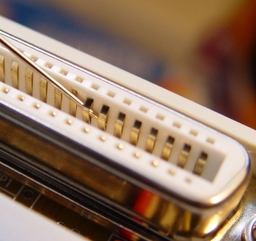
I wrote an article recently about backup strategies. It appeared in the October 2005 issue of the Canberra PC Users Group's "Sixteen Bits" magazine. I have posted an updated version of the article here. In the article I referred to the merits of using a hard drive in a removable caddy as a backup drive. The "caddy" is a removable container in which a hard drive is kept. The caddy slides into a "cradle" (or "rack") that is mounted permanently in one of the CD or DVD drive bays in the PC. The caddy containing the hard drive can be completely removed from the cradle. This setup is also referred to as a "mobile rack" but this is a misnomer - what is mobile is the caddy. The rack is fixed in place and is not mobile.
Some caddies are available for hard drives with serial interfaces. However, most caddies are for hard drives with parallel interfaces. This article assumes that if you get a caddy it will be for a hard drive with a parallel interface.
Power is supplied to the back end of the cradle inside the PC's case, and the cradle is connected to the parallel IDE/ATA interface of the PC. When the caddy is fully inserted, a Centronics-style socket on the outside rear of the caddy mates with a Centronics-style plug on the inside rear of the cradle. This mating pair provides a 5v (red) and 12 V (yellow) power line and a pair of ground lines (black) to the hard drive plus 39 IDE/ATA interface lines. If your PC's motherboard has a parallel UATA (Ultra ATA) interface, the cable from the motherboard to the rear of the cradle will be a flat 80-wire cable going to a 39-pin socket (looks like a 40-pin socket but one pin is absent). If it is not UATA, it will have either a flat 80-wire cable OR a 40-wire cable going to the 39-pin socket. (An 80-wire cable will work fine with a non-Ultra ATA interface because all the extra 40 wires in the 80-wire cable are simply ground wires designed to eliminate "cross-talk" between the data wires.)
I have been using such caddies for about 8 months and have found that the system is very effective in the context of creating clones or compressed images of my master drive, for these reasons:
If you decide to implement a cradle and caddy arrangement, there are three matters that require some thought:
To ensure that there is a cooling airflow over the hard drive
inside a caddy, it or the cradle should have at least one
fan. This is particularly important for modern, fast (7,200
rpm) drives because they get very warm in enclosed
spaces.
Such fans have to be small - about 40 mm diameter and small fans
have a low air shifting ability. Therefore some caddy setups
have three such small fans - two in the cradle and one in the
caddy. I don't like those at all because of the noise.
In any event, I think that one fan in the cradle is quite
sufficient, providing that:
I have found that "Laser" brand caddies are very well designed in terms of maximizing the effectiveness of airflow. When fully inserted, the cradle butts up flush against the back of the cradle, and the air can only be sucked in through the front of the caddy, across the drive, and then out the rear of the cradle.
So I suggest that if you buy a caddy/cradle setup you should have a good look at its design from this point of view.
Because the fan/s in a caddy have to be small - no greater than 40 mm in diameter - it/they add to the PC's noise emissions somewhat, especially if the PC is on the desk close to your ear. So the fewer the fans, the quieter is the PC.
The Laser brand caddy setup has one 40 mm fan mounted in the back of the cradle. I monitor the temperature of my drives using a nice little freeware utility called HD Health. I have found that the single fan Laser rig keeps the temperature of my 7,200 rpm 250 Gb drive mounted in the caddy at about the same as that of the 120 Gb 7,200 rpm drive mounted inside the PC case. This is the reason for my view that providing that the design of a caddy and cradle is effective in terms of air flow, one fan is quite sufficient.
In all the caddy/cradle types I have seen (including the Laser brand), the fan (or fans) are running all the time, irrespective of whether or not the caddy is inserted. This is doubly annoying, because (a) if there is no caddy inserted, there is no need for the fan to be running at all and adding noise, and (b) there is unnecessary wear on the fan, and that will shorten its service life.
To avoid unnecessary noise and wear, I have mounted a microswitch in my Laser cradles. This switch acts in a way that if there is a caddy fully inserted, the switch is closed and current is supplied to the fan. When the caddy is extracted more than about 5 mm the switch is off and no current goes to the fan. Hence, the only time there is any fan noise at all is when the caddy is pushed in all the way. The switch I used is is a sub-miniature microswitch (Jaycar SM1036 costing $3.30. Go to Jaycar and search for microswitch).
The photos below show how the switch is mounted. The way I did this mod is as follows:
Cut one of the insulated wires in the pair of wires that runs to the fan at the back of the cradle (red or black - either is OK)


On one caddy system of mine I noted that on some occasions I was not getting reliable transfer of data and the hard drive operated slowly and erratically. I have had a report of a similar problem from at least one other user of caddies. The problem may be caused by inadequate mating of the big 50-land plug at the outside rear of the caddy with the big 50-land socket at the inside rear of the cradle. With my problem caddy, it seemed to slip into the cradle with very little insertion force being applied and I became concerned that caddy and cradle contacts were unreliable.
After I fine tuned the caddy's socket in the way described below, my problems vanished and have not recurred in the subsequent six months of frequent use of caddies.
The Laser system has a 50-land Centronics style socket at the rear of the caddy and that mates with a 50-land Centronics style plug at the rear of the cradle. My preference is for the caddy's socket to mate with the cradle's plug only after a bit of pressure plus a nice "thunk" indicating that the mating has been effected and all the lands (flat gold-plated springy thingies) in the plug and socket are in firm contact. If your caddy already has to have such pressure exerted to get the caddy fully inserted, then I'd leave it alone unless you are getting unreliable data transfer. However, if the caddy slides in with very little resistance, I'd do the following fine tuning.
For the sockets on all my (3) caddies, I have raised the arching of all the lands very slightly, by only about 0.75 mm. The high-tech instrument I used to do that is a number 9 darning needle carefully inserted under each land in turn.
If you do the fine tuning, do not lever a land up too much. If you do, the pointy end of the land closest to you will pop up out of its bed. However, if that happens, it is easy to recover the situation:
This may sound complicated, but it only takes about 5 minutes to do all 50 lands in the caddy's socket.
If you do that fine tuning, when you insert the caddy into the cradle, you will find it now meets with more resistance at the point when the caddy is almost fully inserted (all but about 5 mm to go). The ideal resistance is one that:
If the caddy is a bit tight, it will slacken over time. A little bit of WD40 or other lubricant that is suitable for electrical switches will help a caddy that is a tad tight to fit in properly.
The lands in the cradle do NOT need to be touched.
If you get a caddy/cradle set:
I attached my microswitch using a very stiff mixture of two-part epoxy resin (West Systems epoxy) and a microfibre-silica thickener. Technical stuff, but those were the things I had on hand. Instead of this stuff, you can use any 2-part epoxy (e.g. Araldite, Bote Cote) and any thickener. A spoonful of VERY fine sifted sawdust is OK as a thickener. You can ask your friendly chop saw operator at your local hardware shop for a cup of sawdust - take it home and sift it, keeping only the very finest particles. Mix enough fines with 2-part epoxy to make a VERY stiff consistency that will not slump.
Place a bed of thickened epoxy into the cradle and sit the switch on top with the spring lever pointing towards the 50-pin plug.
Put a tad of epoxy/thickener mix in the two holes through the
body of the switch. Stick two shortened round-head nails or
short lengths of wire through the holes. Then lay the switch
onto the bed of epoxy/thickener, with the nails or wire pushed into
the bed.
Slurp a little epoxy/thickener over the nail
heads for good measure. The nails or wire will
guarantee that the switch is kept firmly in place when the epoxy is
set.
The position of the switch should be such that when the caddy is fully inserted, the switch will be in the closed position, but the caddy is not prevented from being fully inserted so that it touches the rear of the cradle.