
Author: Mike Boesen (mboesen@gmail.com)
Last updated: 4 June 2006
In recent times a number of members of the PC Users Group have reported intermittent problems which might possibly be caused by faulty PC RAM (Random Access Memory). In my experience, modern memory modules are unlikely to fail, and new brand-name memory modules will almost never be faulty. However, if you have been unsuccessful in determining the cause of an intermittent problem it could be worthwhile testing your PC's RAM. In any event, I would recommend running a memory test under these circumstances:
Keep in mind also that while modern RAM modules are unlikely to be bad or to fail, sometimes they are not installed correctly and a memory test may be useful in identifying such a condition.
This article provides a few hints about:
WINDIAG is suitable for all operating systems. Because the application is loaded from a bootable floppy as the only application, it is able to test ALL your RAM. There are some memory tests around that are designed to be run within Windows, but I would not definitely recommend them because they may be unable to test ALL the RAM.
If there are errors, omissions or hard to understand elements in this article, let me know. I'll incorporate worthwhile suggestions and keep an up to date version on my web site: http://www.pcug.org.au/~boesen/
WINDIAG is an excellent free application which can be used to test a PC's RAM. This is a Microsoft application which can be downloaded from http://oca.microsoft.com/en/windiag.asp That site provides full directions for using the application. You download the file MTINST.EXE and run it within Windows. It will create a bootable floppy disk which has the WINDIAG application on it. If you are an experienced PC user you could download an ISO image and burn a bootable CD which has the WINDIAG application on it.
I'll assume that you will download MTINST.EXE. This file is 639 KB in size, so it's suitable for downloading even if you only have a dial-up internet connection. After downloading and saving the MTINST.EXE file, within Windows (any version of Windows is OK), run the file by double clicking on it in Windows Explorer. Follow the directions that will be displayed. This will lead eventually to the WINDIAG application being created on a bootable floppy disk.
With the floppy disk in your floppy drive, restart your PC. You will need to to have your PC's BIOS configured so that it looks for a bootable floppy disk prior to booting from the hard drive. Most as-bought PCs are configured in that way. If your PC does not boot from the floppy disk, and simply boots from the hard drive as it normally does, you will need to configure the BIOS so that booting from the floppy drive has precedence over booting from the hard drive. Read your motherboard's manual to work out how to do that.
When the PC boots from the floppy, the application WINDAG will start running automatically in its "standard" test mode. This test has 8 sub-tests. You can toggle to a more thorough "extended" test mode (this has 17 sub-tests) by hitting the "T" key on your keyboard. You can toggle back to the standard test mode by hitting "T" again.
This photo of the screen shows the standard test mode in operation:
Note:
If you get any errors it could be because:
If you decide to fiddle with any memory module, note these points carefully:
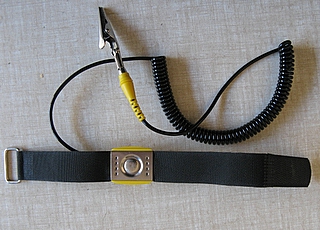
The Jaycar anti-static wrist strap (TH-1780) shown below is a good choice as a grounding lead. It has a velcro wrist strap with a press-button connector for the lead which is very easy to put on or take off. The alligator clip at the end is clipped to a bare metal part of the PC's chassis or to an external earthing point. As the earthing point I use any bare metal part on the PC's chassis. This is grounded through the earth wire in the 240 V power supply cable. I make sure that the 240V power supply is switched off at the wall socket and that the power switch on the PC's power supply unit is off.
First thing to do is to make sure that the memory modules are fully inserted and that the plastic retaining clips at each end of the memory module's socket are in place. The architecture of the sockets and clips and the way that the modules are extracted or inserted will vary, depending on the PC's age and type of memory modules. Check with your motherboard's manual to determine how the modules and retaining clips should appear before fiddling with the modules.
If you are up to removing a memory module, extract it in accordance with the instructions in the manual for your motherboard. Before extracting a module, note carefully which way it is oriented relative to the socket and which socket it was in. The module should not go back into the socket if it is rotated 180 degrees, so make a little diagram of what it looks like when oriented in the way that it was before you extracted it. The retaining clips at the end of the module's socket will need to be levered back before the module can be extracted. Once extracted, clean the gold lands on the module with a clean non-lint cloth and isopropyl alcohol (metho will do) and then dry it with a clean non-lint cloth.
Visually check the insides of the sockets on the motherboard into which the memory module was inserted. Brush out any fluff or dirt. Suck out any free dirt and fluff with a vacuum cleaner. Make sure that you do not leave any brush hairs in the socket.
Reinsert the memory modules in accordance with the instructions in the manual for your motherboard. Make sure that the retaining clips at each end of the socket are closed.
If you have checked for correct module insertion and cleanliness and the memory test is still indicating errors, the problem is most likely a memory module that is defective. If you have more than one memory module, you can determine which is the defective one by removing all modules, than running the RAM test with one module at a time inserted in the "first" RAM socket (See your motherboard's manual to determine which socket that is. If you don't have a manual, the probability is that the first socket will be the one closest to the CPU).
If more than one memory module generates errors when tested by itself, this may indicate that the problem is not in the memory modules at all. Having faults in more than one memory module is an unlikely event and the problem may be in the motherboard. It is outside the scope of this article to recommend what you might do in that instance
If you locate one memory module that generates memory test errors, I'd recommend replacing the defective module because sooner or later you will run an application that uses the faulty area of the module and you will get a malfunction. This can happen when you are running multiple applications or memory-hungry applications. Failure on a memory test may also mean that the module is on the verge of failing in more than one area. Memory modules are relatively cheap whereas messing around trying to find the cause of an obscure memory problem is annoying and frustrating and for some folk, difficult.
If you buy a replacement memory module, check your motherboard's manual to determine what type and size modules are appropriate. If you do not have a manual, some of the major memory module manufacturers have on-line databases that will indicate what type and size modules are appropriate for your motherboard. For example, see http://www.ec.kingston.com/ecom/configurator_new/mfrmod.asp?root=us&LinkBack=http://www.kingston.com and http://www.crucial.com/store/listmfgr.asp?cat=RAM
If you want to identify the type of memory that is installed in your PC, the freeware CPU-Z utility from http://www.cpuid.com/ is useful (it's a 418 KB download). Click the SPD tab to get information about each memory module in your PC. This is the key information about the module in slot 1 (of four slots) in my PC - it's a 256 MB module of DDR PC3200 200 MHz memory made by Kingston:

If you click on the About tab, you'll get to an HTML Report button.
Clicking on it creates a report that you can save. As you can see from
the above clip, CPU-Z can also tell you all about your motherboard and
CPU. So if you don't know what brand and model of motherboard you have,
this application will tell you.
If you want to know more about RAM there are many good sites on the web. This one for example provides a wealth of information: http://www.pcbuyerbeware.co.uk/RAM.htm
If your PC is able to run with a dual-channel memory configuration you might also take that into account when buying replacement memory modules. This paper provides information about that topic (note that the article is 1 MB in size): www.kingston.com/newtech/MKF_520DDRwhitepaper.pdf