Freeware discussion
SmartClose
SmartClose is a freeware alternative to EndItAll2 (still available for free download at the time of printing) that allows you to close all currently
running programs - to minimize conflicts and to
avoid replacing in-use files. This can be a tedious task
when performed manually with ctrl-alt-del, and usually requires a restart to get all your
programs back up and running.
With SmartClose
however, the entire process is simplified and automatic as it stores the running
program information in a system snapshot, and not only closes all applications
for you but also restarts/restores them later. The program can be customized
in various aspects, and a quick wizard also allows you to exclude programs from
being closed or restored. It will automatically skip applications that are
required for the Windows system to run. In addition, it supports services, as
well as Explorer and Internet Explorer windows and saves their current
location, so they can be restored properly.
While offering essentially the same features as EndItAll it is
immensely slower and, while it permits restoration of the system
state without rebooting, it does not appear to restore all running
programs. On my PC it does not restore the desktop search, Copernic, or the antivirus, Avast,
icon to the system tray. Checking through Process Explorer revealed
that both of these programs were, in fact, running. I was able to scan
files by right clicking, and I could show the Copernic toolbar on my
desktop, but no longer had direct access to either program. This
issue is one of the negative aspects discussed in the user forum at http://www.snapfiles.com/opinions/SmartClose/SmartClose.html
My own peace of mind requires that I restart anyway, so I see no advantage in the restore function. Try it for yourself.
TerryB
How to directly boot into Windows XP, without logging-in or entering passwords:
1. Click Start > Run
2. Type ‘cmd‘, hit enter
3. At the command prompt type: control userpasswords2
4. A Windows-2000 looking window will popup, and under the Users tab uncheck the option selected,
“Users Must Enter A User Name And Password To Use This Computer”
5. Click OK
6. Enter the username and password of the account you would like Windows to automatically log into after booting up
7. Close, reboot windows to test it out.
Booklet macro for Microsoft Word
It is often desirable to produce a
document in other than conventional A4 format, and many PC users employ
programs like FinePrint
to print professional A5 size booklets with
correct page numbering automatically and painlessly. But many users
cannot justify the expenditure on this fine program when they only need
to print the occasional booklet.
Microsoft have addressed this issue and provide a macro for their Word 2002 word processor that has the built-in ability to print booklets with automatically numbered pages, and is available for free download from http://word.mvps.org/FAQS/MacrosVBA/BookletMacro.htm
Changing the "registered owner" in Windows
Does Windows think your name is
"Satisfied Dell Customer"? When you install new programs, do they want
to send a confirmation e-mail to "OEM User"? Or when you first
installed Windows, did you misspell your own name?
A rose by any other name
When
you first install Windows, the installer prompts you to type in your
name and organization. If you bought your computer with Windows
pre-installed, you probably had an opportunity to type your name and
organization too, although the computer manufacturer may have filled it
in for you. (Thus, the ubiquitous "Satisfied Dell Customer".)
You
might think the name and organization live somewhere deep inside your
PC, chiselled in stone on some super-secret security chip. Not so. In
fact, they're both stored in the Windows Registry - and they're very
easy to change, if you know where to look.
Tweaking the Registry safely
Many
people believe that demons and monsters lurk inside the Registry; one
wrong step and your system's toast, never to boot again.
Guess what? They're right.
If you bang around the Registry, you may
well succeed in reducing your PC to a lump of quivering dissociated
electrons. But if you're reasonably good at following instructions -
say, on a par with the "Apply, lather, rinse, repeat" directions on a
shampoo bottle - there's no reason in the world why you can't go in and
change your registered owner name, and live to tell the tale.
Finding RegisteredOwner in the Registry
First, do a "System Restore".
To dig into the Registry, you need a program called the Registry Editor. It's easy to find: click Start, Run, type regedit and press Enter.
On the left side of the Registry Editor
window, double-click HKEY_LOCAL_MACHINE, then double-click SOFTWARE,
then double-click Microsoft, then double-click Windows NT (yes, it's
Windows NT, even if you're using Windows XP), then double-click
CurrentVersion.
On the right, you should see a list of
Registry values, with columns labelled Name, Type, and Data. The two
names we're concerned about: RegisteredOwner and
RegisteredOrganization. If you don't see those names in the right pane,
you're in the wrong place, so click File, Exit to get out of the
Registry Editor, and start all over again.
Changing Windows' owner and organization
To change the registered owner, double-click the name RegisteredOwner.
In the box marked Value Data, type in whatever name you want to appear
as the Registered Owner (such as William Gates III). When you have the
name right, click OK.
Similarly, to change the Registered Organization, double-click RegisteredOrganization and type the new organization name in the Value Data box.
When you're done, click File, Exit to
get out of the Registry Editor and back into reality. Make sure you got
it right by clicking Start, right-clicking My Computer, and choosing
Properties.
Baillie McKenny
PopTray
PopTray is a freeware mail notifier similar to Mailwasher, and FrontGate.
Each of these utilities has its particular presentation and features,
and consequently its devotees. Unlike some other mail clients Poptray
has plugin support for protocols
other than the common POP3, including IMAP4, POP3SSL, Hotmail, etc.
PopTray integrates with all popular
mail clients such as Microsoft Outlook Express, Eudora, and
Mozilla Thunderbird, and permits an unlimited number of accounts. Each
of these is allocated its own tab. Messages can be quickly previewed
without downloading. You’ll be able to see who the email is
from, the subject, and the
attachment. This will enable you to decide if you want to delete the
email, mark it as spam, or keep it. A great way to stop viruses or
large attachments.
Spam management includes creating
rules and using white/black lists for control. Rules identify a
message according to your criteria then carry out the action you
specify, like deleting from the server or marking as spam. The white
list is used to specify friends you would want to receive messages
from. If someone is listed in the white list, any email from him
would not be deleted even when a rule attempts to delete the
message. The black list is email addresses that you do not want to
receive any mail from. If the address is listed here any
message from that address will be deleted every time you check the
server.
Creating new mail will open your
default email client ready to send a message. Clicking the Reply
button will open your default email client and create a message ready
to reply. When the "MAPI instead of mailto:" option is
checked, the reply will use your default MAPI client. When using MAPI your
complete body will be quoted in the reply message. Using "mailto:" limited the
reply body to 2000 characters.
With the prevalence of spam and
malicious emails like phishing scams, it is almost essential to have a
facility for previewing your mail. Mailwasher and FrontGate have been
around for a long time. This newcomer to the field may be what you
need.
TerryB
Windows XP Chkdsk
Recently, I used the Windows disk
checking and repair utility (in anger) and successfully. Again I
realised that this procedure was relatively unknown, and by those who,
perhaps, should have known. This utility should be one of the first
steps in troubleshooting a failing hard drive...
It can also be useful if you cannot boot into Windows, but can get to the DOS prompt (Using F8 on boot)
In Windows XP you can perform error
checking on hard drives by using the chkdsk.exe command line utility.
Chkdsk will verify and repair (optionally) the integrity of the file
system on any chosen volume. You should run this utility (yes, another
one) on a regular basis (at least once a month?).
Windows XP Chkdsk - How To Use The Command Line...
When Windows XP encounters a problem
and has to shut down - perhaps there is a power cut, a motherboard
problem etc.. the operating system will "flag" the volume as "dirty"
and attempt to check it on reboot.
NB - You can manually check the state of the dirty flag for your C: drive.
To do this at the Command Prompt type : fsutil dirty query c:
The response should be Volume - c: is NOT Dirty
However, you can manually run the chkdsk command.
To do this:
Step One: Click Start, select Run
Step Two: In the box, type cmd
Step Three: Click OK
Step Four: Run the chkdsk utility by typing in the following command: chkdsk c:
..or chkdsk c: /f /r
NOTE: The /f
command automatically fixes any errors encountered; the /r command
locates bad sectors and recovers readable information.(Assuming the drive you wish to check is the C: drive.)
Step Five:
A reboot is normally required for the chkdsk program to run correctly,
so simply restart the computer and chkdsk will run automatically. When
it's finished, (this process can take quite a while depending on the
size of your disk, etc.), it will boot back to normal Windows.
On Rebooting the PC you will see the disk being checked as in the screenshot below:
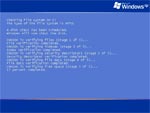
This process can take up to an hour!
Windows XP Chkdsk - How To Use The Graphical Version...
In addition to the command line utility detailed above, it is possible to access a graphical version of the Windows XP chkdsk.
To do this:
Step One: Open "My Computer", RIGHT click on the C drive icon, choose "Properties".
Step Two: When that loads, click on the "Tools" tab, then click on the "Check Now" button in the "Error Checking" section.
Step Three: When that little window loads, place a CHECK in BOTH boxes, then click on "Start Now".
Step Four: A message will pop up saying that Error Checking will run after you restart the computer, so... restart the computer.
Error Checking will run automatically after the restart and it locks you out until it's finished.
It takes some time to perform the task - it will restart into Windows automatically.
Baillie McKenny
INDEX NEXT