Web hosting in action
When you installed XAMPP it started automatically. But you have reset your computer, and now need to restart XAMPP. You will have a desktop icon, something like this. Click on it to open the Control Panel.
This is a small part of the Control Panel, the bit that matters. The buttons under 'Actions' will be set at "Start", so click the first 2 (the ones opposite Apache and MySQL) and watch them become active. There will be port numbers displayed, and a green blush on the module names will indicate that everything is working. To check, open a browser and type localhost in the URL box. You should see the XAMPP welcome screen.
However, there is a gotcha here. If you have Skype running, Apache may not activate. This is because they both like to use port 80, and won't play nicely together. The solution is to exit from Skype while you are using XAMPP.
Action at last!
Let's try some practical things - but first, a few things you need to know.
- The URL of the server is localhost (or 127.0.0.1)
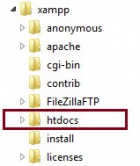
- Your directory tree will have a folder named xampp.
- In that folder will be a sub-folder named htdocs. All files, scripts and so on that you want to reach by way of a browser are stored in the htdocs folder
- The system will always look for and action any file named 'index' - eg, index.html or index.php, before it does anything else.
Let's make the traditional HTML file...open a text editor and type:
<html>
  <head>
    <title>My first page</title>
  </head>
  <body>
   Hello World!
  </body>
</html>
Now to save your file in the htdocs subfolder.
Save it first as index.html - and to see your work, open your bowser and type localhost.
Now delete index.html, and save the file in htdocs as test.html. To see it now, you point your browser to localhost/test.html
Let's try a PHP script. It doesn't matter that you don't know PHP, I'll provide one. Go back to your text editor and type into a new file:
<?php
phpinfo();
?>
Save that in htdocs as index.php - and then open your browser and type localhost. This will show you a page (or 6) of the setup information of PHP within XAMPP (or LAMPP).
Now delete index.php and resave the file as info.php. Back to your browser, and type localhost/info.php
I'm sure you can see the difference caused by the name change. The real point, though, is to suggest to you to be very wary of the word 'index' in file names!
On to Part 3...[1]

