Scanning Slides using CanoScan
Scanning 35mm transparencies with CanoScan 9950F
The CanoScan 9950F provides a variety of settings for scanning batches of up to twelve 35mm transparencies and storing the scanned images as BMP, JPG or TIF format files in dated subfolders. First create a folder to receive these subfolders as for example in "C:\My Pictures\35mm slides" in your home computer or "35mm slides" on a USB memory stick for images to be obtained by scanning with the PCUG scanner. Image files may then be selected from these folders for processing/enhancing as with Paint Shop Pro, PhotoShop, PhotoStudio or similar.
With appropriate settings, routine scanning of transparencies requires only the clicking of the Scan-2 button of CanoScan Toolbox and then clicking Scan, Preview and Scan in the successive displayed windows. (By default the Scan-1 button is for scanning opaque documents or prints on the CanonScan platen.)
Setup
- Remove the white platen from under the lid of the scanner (click is at its top) to allow scanning of transparencies or film. (The platen is used when scanning opaque items.)
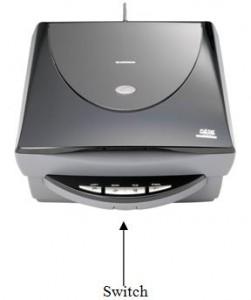
- Switch CanoScan on with button underneath the button bar on the scanner. (Note: The buttons on the scanner button bar all function but are not used for the present scanning procedure.)
- Place transparency/film holder on scanner glass. Avoid touching the glass to avoid marking by finger prints.
- Turn on PC.
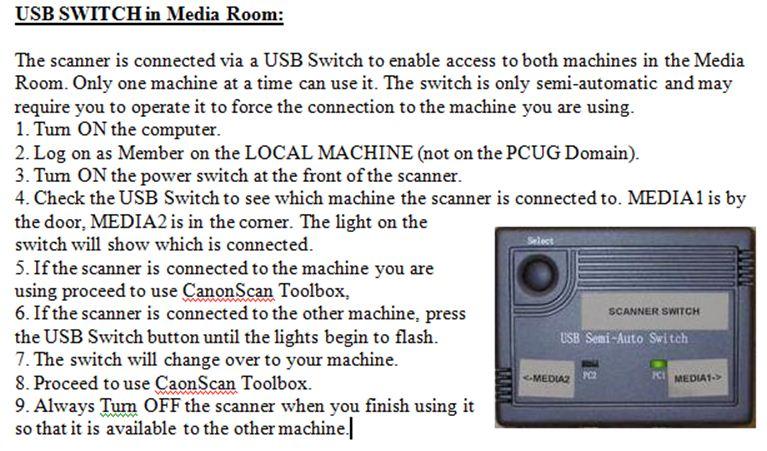
- Login after Ctrl+Alt+Delete with displayed details on MEDIA2 (Media Room computer). See instructions attached below for the USB switch in the Medial Room.
- Display CanoScan Toolbox 4.9 by clicking the icon , third from the Start button on taskbar at bottom of the monitor screen.
Scanning
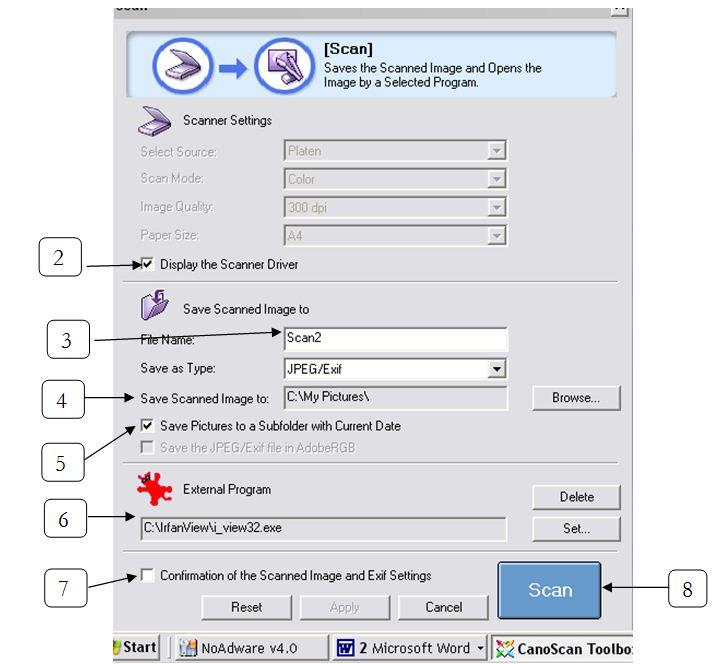
See tags on images below.
[1] Click Scan-2 for scanning of 35mm slides.
[2] Tick to Display the Scanner Driver. This will grey out the 4 Scanner Settings and provide instead a choice of settings on the Advanced Mode page as for example to select an area for scanning and as described below.
[3] Nominate a name for the image files and the format JPEG.
[4] Location for the scanned images folder such as "C:\My Pictures\35mm slides" in your home computer or "35mm slides" on a USB memory stick.
[5] Optional use of subfolder with current date.
[6] External program for generating the picture files for scanned images (eg.IrfanView on the PCUG computer).
[7] Save time by not ticking for confirmation.
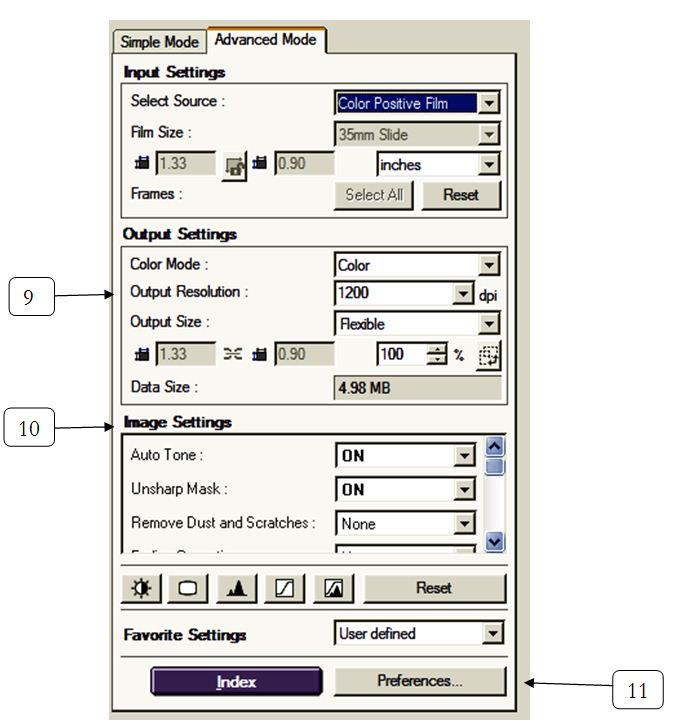
[8] Click Scan to go to next page and select Advanced Mode. Suggested choice of options is:
[9] 1200dpi is adequate resolution for printing images to A4 size even with image cropping to about half size. 2400 or 4800 could be chosen for poster size prints producing image files 4x and 16x larger but large files may result in storage problems or make some editing operations painfully slow. 300dpi is adequate for scanned documents.
[10] Various image settings can be chosen to enhance scanned images but each of these will slow up the scanning process. Corresponding enhancing processes are provided by PhotoShop or Paint Shop Pro and with these programs the processes may be applied more conveniently to all files in a folder (such as 35mm slides folder for 4) by a batch process in conjunction with other processes as for example to convert the file type recommended by these programs for enhancing images.
[11] For routine scanning Preferences provides Automatically Execute Preview to replace step 12.
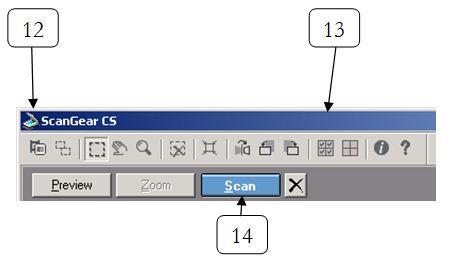
[12] Click the first button on the toolbar to toggle for thumbnails of the transparencies in the scanner.
[13] Click the button on the top toolbar to tick/select all files for scanning.
[14] Click Scan to start the scanning putting and store the scanned images in the dated folder as specified in step 3.
