User:Rpeters
Projector
Be aware that projectors and monitors have two fundamental differences as external displays
- The majority of projectors, particularly those oriented to "home theatre" are still manufactured with 4:3 ratio display generators
- projectors have many fewer megapixels than do laptops and medium to large monitors
For General Users
Virtually any computer having two display outputs can be made to drive two displays (whether monitor(s) or projector(s) - after a fashion
- occasional users should get adequate result by following the simple guidelines below
- regular users might want to follow the more technical guidelines to try to optimise the displays somewhat
Now the bad news: The potential combinations of hardware and software capabilities are huge.
Additionally, flat panel displays, whether generated via LCD, LED or DLP, produce clearest display only at their native resolution
Projectors for Presentations
Image clarity is paramount for still images as used with presentations
- the human eye cannot resolve high resolution images at the distance typically used with projection screens
- ascertain the aspect ratio of the projector
- if documentation is not available, the ratio of the plain, white image produced when a computer is not connected is a good guide.
- ascertain the native resolution of the projector. In the absence of documentation:
- 1024 x768 is typical for 4:3 ratio projectors
- 1280 x 800 is typical for 16:10 ratios
- 1280 x 720 is typical for 16:9 ratios
- from the computer's Control Panel go to Display and set:
- resolution to same a projector
- tick the box "duplicate/clone these displays"
- click "save" and the desktop should be duplicated on the projector
Display on the laptop/PC will be less than optimum
- "wide-screen" displays may have unlit areas at sides of display
- may be less clear as a result of lower resolution
The above are unavoidable compromises to obtaining clearest display on the projector
Common Problems
- display on the projector is a plain desktop wallpaper without icons or windows for apps
- This is caused by not having the displays duplicated
- revisit Display setup on the computer
- "wide-screen" display on a 4:3 ratio projector
- this is a faulty configuration, which results in less clear display and needs to be corrected
- revisit Display setup on the computer
- if still not corrected, this likely results from default settings in the projector
- activate projector's on-screen display
- navigate to aspect ratio
- change from "auto" or 16:9 to 4:3
First the good news: Virtually any computer having two display outputs can be made to drive two displays (whether monitor(s) or projector(s) - after a fashion
Now the bad news: The potential combinations of hardware and software capabilities are huge.
- occasional users should get adequate result by following the simple guidelines below
- regular users might want to follow the more technical guidelines to try to optimise the displays somewhat
Be aware that projectors and monitors have two fundamental differences as external displays
- The majority of projectors, particularly those oriented to "home theatre" are still manufactured with 4:3 ratio display generators
- projectors have many fewer megapixels than laptops and medium to large monitors
Projectors for Presentations
Preliminary Configuration for Laptops
Projectors for Presentations
Projectors for Home Theatre Use
The majority are still 4:3 native ratio
- but have the capability to accept 16:9 ratio input, typically to support movies
- many default to this ratio and require no reconfiguration
- will display 16:9 ratio input via "letterboxing", ie blanking out the top & bottom 100 or so rows of pixels and displaying image in reduced size
- uses more than the native number of pixels and causes some reduction in image clarity
- which is not significant for movies
- but noticeable with still images (as in presentations)
Up-market projectors are now being manufactured with 16:9 ratio display generators
Getting Technical
Be aware that 3 ratios are in common use for displays - 4:3 and 16:9 for consumer grade devices plus business grade monitors & projectors that support the 16:10 wide-screen ratio
- better quality 16:9 and 16:10 displays might present the complete, alternative image correctly via blanking some rows or columns of pixels with slight "letterboxing" or blank right & left margins
- others will distort the image slightly to occupy the full visible area
All digital displays, whether LCD, LED, Plasma or DLP provide the sharpest image only at their native resolution
Linux & iOS support different resolutions on the two displays
- low end hardware might not support this well, if at all
- if the resolutions selected have differing vertical resolutions on the two displays, then the bottom panel used by many desktops will be absent on the shorter display
- might need to compromise with either
- identical vertical resolutions or
- setting the primary display to the higher vertical resolution
- might need to compromise with either
Strictly for Geeks
For General Users
The idea of having both Windows and Linux installed on a computer and being able to select one at boot time appeals to many who are trying, or migrating to, Linux.
- Windows own bootloader cannot boot Linux
- a Linux bootloader must be used with dual-booting
The better known Linux distributions will set this up automatically, during installation to a single hard disk drive in the computer
- It is likely to cease functioning following the next update of Windows and
- restoring dual-boot requires Getting Technical
Keep at least one emergency boot medium handy. See Emergency_Boot - Including for Dual-Boot
Getting Technical
The above problem can usually be obviated by having additional hard disk(s) in the computer. This is not an expensive option, given current HDD prices.
USB Drive
Pros
- easily added
- no change to internal HDD
Cons
- Linux relies on the absolute order of storage devices detected by the computer's firmware
- plugging in (say) a uSB memory drive, may upset the booting
- many bootloaders will identify partitions via UUID, to overcome this limitation
Internal HDD
- ensures permanent order of drives
Installation
- mainstream Linux will allow installation to== Strictly for Geeks == a second HDD
Selecting Boot Device
The selection of "drive" and hence OS is done at POST stage and depends on type of firmware in the computer
see Booting from Removable Media
Strictly for Geeks
- the bootloader must also be installed to the second HDD, in this technique
- can require "drilling down" the installation options
--Rpeters11:28, 24 August 2012 (EST)
--
Bootloaders
Elilo
Only for computers having EFI firmware
Fairly simple and reliable
- but requires a running Linux to generate its config file, in advance
GRUB Legacy (aka 0.97 )
A simple, reliable bootloader, although being phased out and no longer maintained. Use situations:
- have only Linux on /ext(n) partitions and (maybe) Windows
GRUB (aka GRUB 2 )
GRUB 2 is now the most frequently used bootloader in Linux, but has many remaining issues. Some work-arounds:
"on-the-fly" Mode
GRUB 2 relies on a pre-defined config file /boot/grub(2)/grub.cfg. If this is not located, for any reason, GRUB 2 may boot to a grub> prompt. To boot from here use the following commands, substituting relevant drive and partition numbers:
- grub> set root='hd0,gpt10'
- grub> linux /boot/vmlinuz root=/dev/sda10
- grub> initrd /boot/initrd
- grub> bootBlockquote</blockquote
notes
- drive numbers start from 0
- must specify whether partitioned mbr or gpt
- set root refers to location of partition containing /boot for the operating system to be booted
- which will often also be the root file system for Linux
- or merely the system partition for Win
- partition numbers start from 1 (unlike in GRUB legacy)
- this procedure is easiest if kernel & initrd have easily remembered names
- either soft-link generic names or
- press TAB to see possible names
- ctrl-x or F10 may be pressed in lieu the "boot" command
The above procedure may be modified to cater for the situation where the menu is presented but the desired OS is not included or fails to boot. either
- press e to edit a menu item or
- press Esc to get to command line, then proceed as above.
Menu mode
See GRUB 2 downloadable manual or use "info grub2" to obtain details. Consistent themes amongst various documentation for GRUB 2 are that:
- it is unreliable beyond the basics
- OS-probe module is particularly so
- not putting bootstrap in MBR (protective MBR in case of GPT) will
be problematic
Indeed, "info grub2" recommends avoid all automated installs & configs by distro. Instead, manually grub2-install then write a simple, static /boot/grub2/grub.cfg. See below for outline of this procedure.
As of Jan 2014 and following application of two patches to GRUB in openSUSE 13.1, its GRUB has been brought to ver 2.00-39.4.1. The automated process works well enough for most Linux plus Windows
It failed to find ArchLinux - which uses unusual names for kernels & initrd. Simple work-around for that is to add a 90_persistent section at the end of /boot/grub2/grub.cfg
### BEGIN /etc/grub.d/90_persistent ###
menuentry 'ArchLinux (<your descriptor>) { set root='hd<n>,gpt<n>' linux /boot/vmlinux-linux root=/dev/sd<x><n> initrd /boot/initramfs-linux.img }
### END /etc/grub.d/90_persistent ###
Essentially, the 90_persistent section gets copied verbatim during any subsequent manual or automated run of grub2-mkconfig. Note that this feature might be unique to openSUSE
The curly braces are essential and enclose GRUB2 commands.
This was for a HDD partitioned GPT. replace partition number with mbr<n> if applicable.
Multiple menuentries could be put in 90_persistent to cope with multiple Linuxes.
�
It's also possible to add an entry by pressing "c". In this mode only the 3 commands are input, followed by a fourth command 'boot'CTL-x at the Someone asked how to increase the font size in boot menu. The manual grub.cfg essentially does that by using whatever font will fit on the http://www.pcug.org.au/info/index.php?title=User:Rpeters&action=submit#on in GRUB legacy. press 'e' to edit an entry.
It's also possible to add an entry by pressing "c". In this mode only the 3 commands are input, followed by a fourth command 'boot'CTL-x at the Someone asked how to increase the font size in boot menu. The manual grub.cfg essentially does that by using whatever font will fit on the default screen resolution. Alternatively, one could try to make sense of the "loadfont" parameters in /etc/grub.d/00_header.
Wheras GRUB legacy uses similar syntax in command and menu mode, GRUB 2 uses somewhat different syntax in the two modes.
Rescue mode
An ISO image can be prepared, that is tailored to the OS on a specific computer. See above documentation for details on preparation of this image. It can be tested by "dd" to a USB memory device.
ReFind
Only for computers having EFI firmware
- a CD can be downloaded, to test, if uncertain of firmware
default screen resolution. Alternatively, one could try to make sense of
the "loadfont" parameters in /etc/grub.d/00_header.
Wheras GRUB legacy uses similar syntax in command and menu mode, GRUB 2 uses somewhat different syntax in the two modes.
Rescue mode
An ISO image can be prepared, that is tailored to the OS on a specific computer. See above documentation for details on preparation of this image. It can be tested by "dd" to a USB memory device.
ReFind
Only for computers having EFI firmware
- a CD can be downloaded, to test, if uncertain of firmware
Syslinux
A proven bootloader, that continues being developed and maintained. Main limitations:
- can't directly boot programs on other than its own partition, resulting in the need for work-arounds:
- either chain load all but one OS or
- put the boot code for each OS in a different sub-directory on the syslinux partition
DOS USB
For General Users
Purpose
The main requirement for a USB memory device that boots to DOS operating system arises when a BIOS/Firmware update of a computer is required.
It is advisable to use a new, or little used memory device, because any error in reading the BIOS/Firmware code during the actual update is likely to result in an unusable computer. USB "thumb" drives could be used. SD cards, which can be removed and stored in a secure place, might be more applicable.
Procedure
HP provide two techniques for producing DOS USB sticks. Both place utility software on a Windows computer, in order to generate the bootable stick - see "Getting Technical" below, if Windows is not available.
Instructions are provided on the HP support site for installing these utilities to Windows and creating bootable USB stick(s)
- HP's generic utility HPUSBFW is not self contained but is more flexible.
- it produces a mimimal DOS bootable USB stick containing only nnnDOS.SYS & COMMAND.COM
- the user can then add relevant firmware and flashing utility
- although it has an option for formatting to FAT 32 only FAT actually works
- requires one of HP's "Softpacs" (firmware updates) for one of their recent commercial notebooks, from which to obtain the Windows utility program, plus
- also requires FreeDOS (which can be downloaded at no cost in the form of fd11src.iso from http://www.freedos.org/download/)
- those wanting to upgrade the firmware in a HP computer might find the second tool more suitable. HP provide some of their firmware updates as Windows dotEXE files, which:
- install a utility program to Windows and then have facility called ROMPAQ for creating a bootable DOS on a USB device of not greater than 2 GB (FAT 16)
- automatically adds the firmware and flashing utility to the USB stick
- the naming convention for these files is SPnnnnn.exe
Note that in order to use the former, generic technique, general users would need to burn the above ISO image to CD. Those not familiar with ISO images should read http://www.pcug.org.au/info/index.php/Using_dotISO_Files
The step of burning the ISO image can be avoided - see "Getting Technical" below
Getting Techhnical
The techniques above contain the Windows version of Syslinux in the Windows software package and install the former as a bootloader on the USB device. The Syslinux bootloader can also be added to a USB memory device via Linux. Generic instructions are at the following site, from which (superceded versions of) the code are also available
http://goebelmeier.de/bootstick/
The following would need to be downloaded to obtain up-to-date software:
http://www.freedos.org/download/fd11src.iso
https://www.kernel.org/pub/linux/utils/boot/syslinux/6.xx/
Syslinux will already be installed on many Linux systems. However, Ubuntu and openSUSE might produce a USB stick that invokes graphics at boot time and it is undesirable to have superfluous code on a device that will be used for firmware upgrades.
FreeDOS supports FAT 32 and consequently the above procedure should also work on FAT 32 formatted sticks of > 2 GB capacity. PRINTING VIA NETWORK
PRINTING VIA CUPS
Overview
CUPS is not applicable to Windows. Windows users see Printing via Network
CUPS now the default print sub-system in most Operating Systems - Android, ChromeOS, MacOS, Linux and BSD.
Its use can enable printing over a LAN to be achieved relatively simply, often requiring:
- no additional installation of software or "drivers"
- only simple configuration changes
Applicability
Android & iOS
Typically these require an App to be downloaded from the relevant Store and connect with WiFi enabled printers.
Linux & OSX
Both use CUPS and can be configured as below.
For General Users
Definitions
Those acquainted with client/server model can skip to sub-item "CUPS Versioning Issues"
- "client computer" means the computer/device from which the print job will be generated
- it must have CUPS client installed, which is the default condition for Max OSX and Linux
- it need not have any printer drivers installed
- indeed, it is less confusing if it does not
- "server computer" means the computer controlling the printer. It can be:
- for network printers, which are connected directly to a network, any computer on the network, having the relevant CUPS print drivers installed
- network may be wired, WiFi or bluetooth
- it is perfectly acceptable to configure several computers to use a particular network printer
- for USB/parallel attached printers, the computer to which the printer is attached
- it must have CUPS server installed, which is the default condition for Max OSX and Linux
- the relevant printer must appear in its "Printers" list, and be working
- the computet must be posered on, to enable printing, although logon won't usually be required .
Prerequisites
This guide assumes that CUPS is installed and generally functioning on both computers. The screen shots are from CUPS version 1.4.x/1.5.x. Versions 1.6 et seq have similar menus, but fewer options, with some changes having to be effected via computer's Control Panel instead.
CUPS Versioning Issues
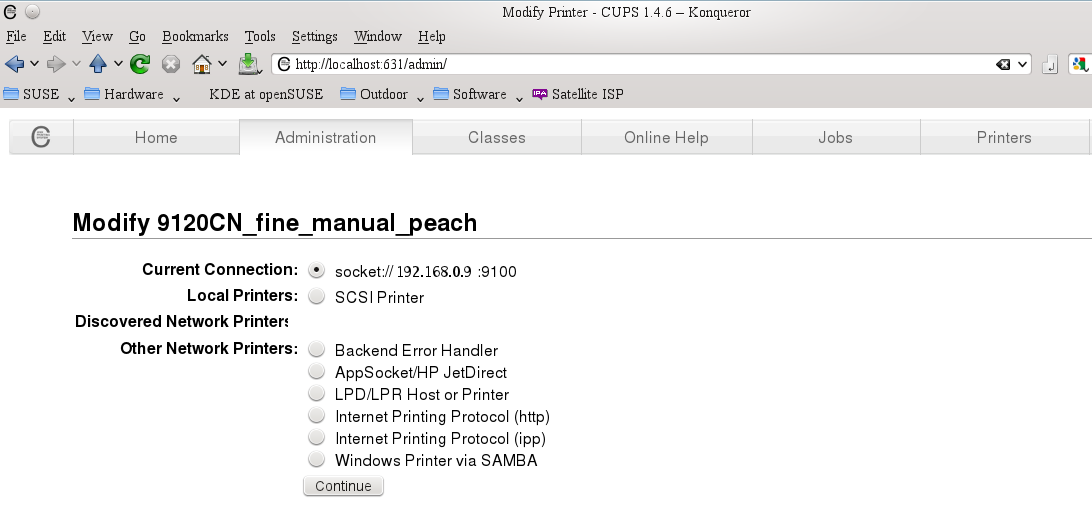
Firstly it is essential to ascertain which release of CUPS is in use, because versions 1.6 and later are largely incompatible with earlier releases. If uncertain, then on each machine involved in the network printing browse to:
https://localhost:631/admin
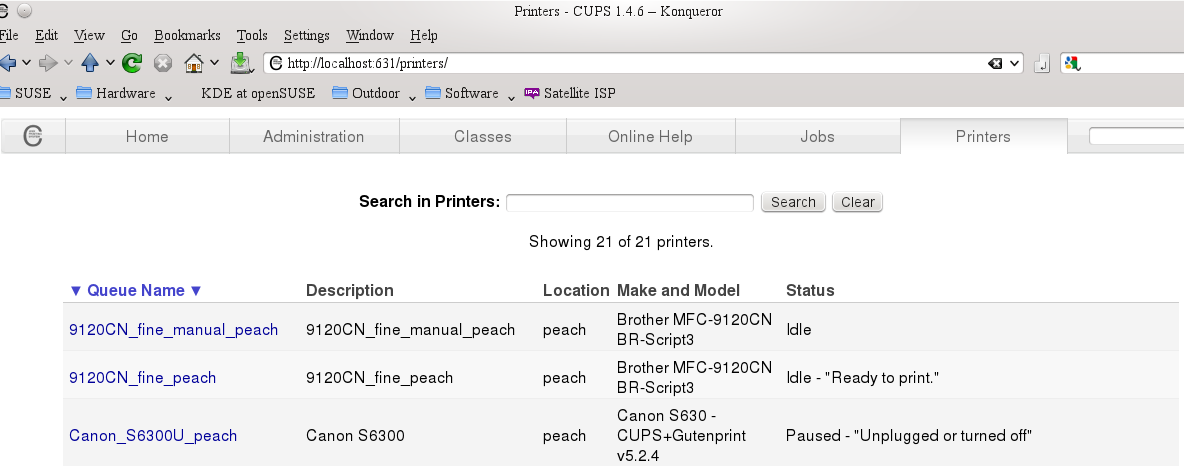
the release number should be displayed in the title bar
- CUPS <= 1.5.4 uses substantially different process from 1.6 and later
- printing between machines mixing these versions is complicated. see below for guidelines, if unavoidable
- as CUPS <= 1.5.4 is now used mainly in older OS, there is a case for upgrading the OS on such machines to a current release.
- it is not feasible for General Users to upgrade the version of CUPS without upgrading the whole OS
- CUPS 1.6 and later
- Devices sold by Apple Inc can deploy proprietary extensions to CUPS. Consequently, some features may not work as expected, if the print job is sent to a printer that is controlled by another version of CUPS
As a general rule, the print server should have a version not earlier than the client
CUPS mixed networks <= 1.5.4 plus 1.6 et seq
Network printing in this environment is more complex. For a guide to procedures see: http://doc.opensuse.org/release-notes/x86_64/openSUSE/Leap/42.1/
Sample screen images displayed in the following sections are similar for CUPS 1.4 and later.
CUPS 1.6 and later
Later releases of CUPS impose greater network security. Default settings vary with system and may require some troubleshooting if client and server have different origin.
The following client systems automatically discover network printers, from default configurations
- Linux Mint 17.3
- openSUSE Leap
- openSUSE Tumbleweed
Other environments may require changes For a quick test, from the client computer, open any page in a browser or editor and select "Print"
- if any of the networked printers can be selected then no further configuration is required
- if not then:
Temporary Fix
The following procedure is adequate for portable machines that are away from home base. It might also suffice for other computers that are rarely used to print.
- does not require Admin privileges on most systems
- but does require IP address or host name of the machine sharing printers
- settings cannot be saved
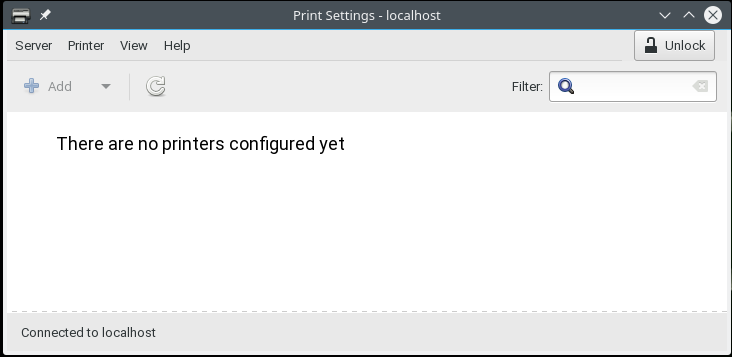
The Print Settings applet is usually accessible from the main menu and typically has the icon at left
Start this applet to get its main window as below
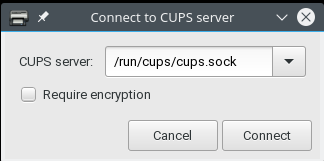
Pull down the Server tab and select Connect, to get the following pop-up dialog
Change the name of the server to hostname
or IP address of that required and click on Connect
From the client computer, open any page in a browser or editor and select "Print"
- if any of the networked printers can be selected then no further configuration is required
- if not then:
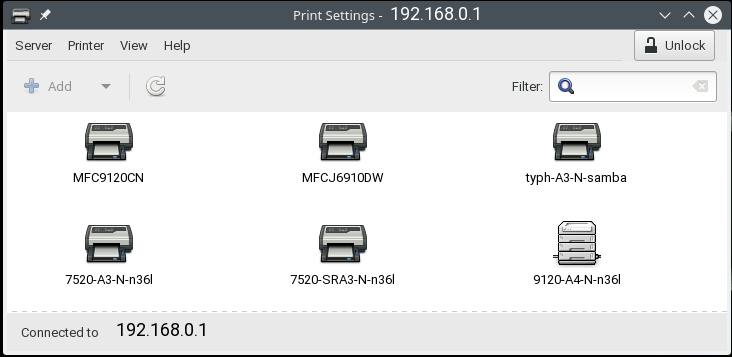
Main window should now display all discovered printers on the network
From the client computer, open any page in a browser or editor and select "Print"
- if any of the networked printers can be selected then no further configuration is required
- if not then:
If printers are discovered then any newly opened app eg LibreOffice, browsers, editors etc should be able to select and print to one of the printers
If no printers are discovered then changes in configuration are required, as below
Retained Configuration
Neither of the two tools widely deployed for administering CUPS are able to make permanent changes to printer discovery. Both amend the same underling config files:
- system-config-printer (aka Print Settings)
- the URL https://<localhost or URL>:631
Some of the changes required below need to be made by editing conf files and executing commands at a terminal
Summary of Changes
Several settings might need to be changed to print via network - in summary:
- amend firewall settings, on both ends, if necessary
- firewall on router should not be altered
- set client to use printers shared by another machine on the network
- in many installations this suffices to get printing working via network
- activate cups-browsed service via system services (systemd) on both ends
- only in deployments using this separate service
- set CUPS on server to share printers but only to the local network
- often the default setting
It might pay to configure the client computer first, because other machines are often set to share their printers to the local network.
- must be done via Control Panel or a combination of editing files then executing commands
The Print Settings applet typically has the icon ![]()
From the client computer, use "Control Panel" to set the following, if available (exact menus and terminology will vary):
- firewall on server must have port 631 open
- configure "Printers" to use network printers
- note that in many Control Panel apps this item is merely a link the applet "Print Settings", which does not allow changes to print server to be retained.
In cases where Print Settings is the only tool available:
- temporary changes to select print server can be made from the applet
- permanent changes need to be made manually, as follows:
- modify "system services" (exact terminology will vary)
- enable and activate "cups-browsed"
- not identified as a separate service in some distro (and then not required)
- modify the file /etc/cups/client.conf**does not require a web browser, which might not be present on a server
- on many systems this will not exist by default, but creating it, pointing to a valid IP address that is sharing printers, is usually sufficient to enable the client to use shared printers. Only one line is required in this file:
ServerName <IP address of machine sharing printers>
- one only servername is used
- where multiple appear the last is used
- many systems default to "localhost" or /var/run/cups/cups.sock
- can be retained, provided not the last listed
- does not require a web browser, which might not be present on a server
Some distro are issued as specific desktop (client) or server releases. The desktop releases might not provide for changed settings to be saved. That allows eg a laptop away from its home base to print, without disturbing longer term settings.
From the server computer, use "Control Panel" to set the following, if available (exact menus and terminology will vary):
- firewall on server must have port 631 open
- modify "system services" (exact terminology will vary)
- enable and activate "cups-browsed"
- not identified as a separate service in some distro (and then not required)
- enable and activate "cups-browsed"
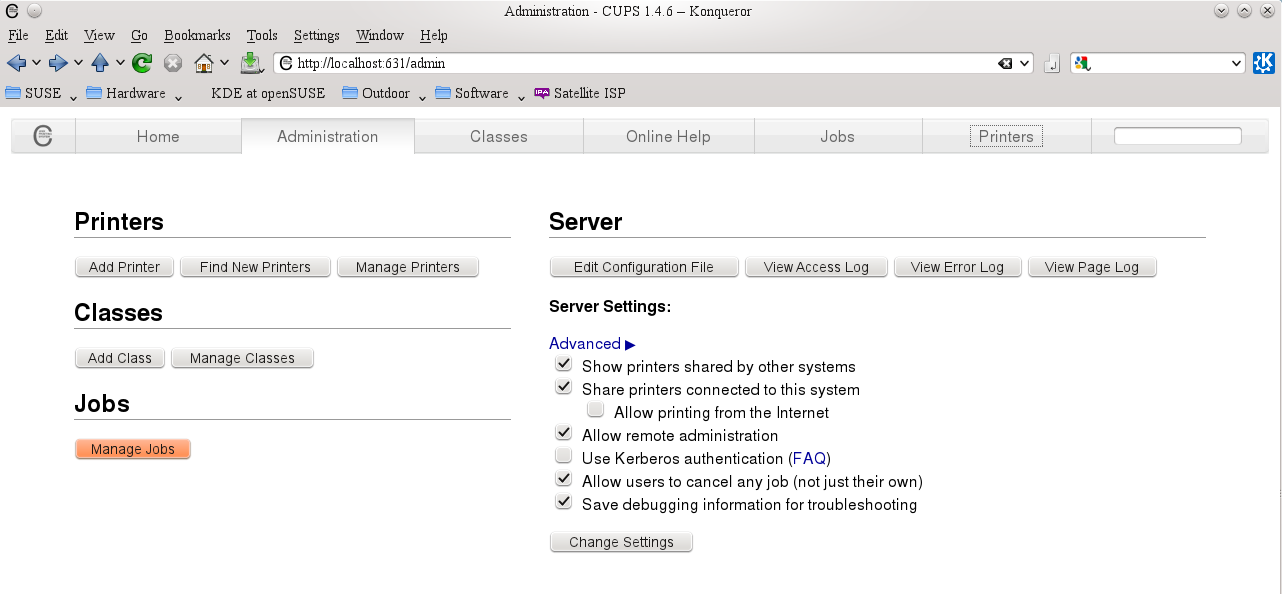
From the server computer, use any browser to https://localhost:631/admin
and activate radio buttons to:
- Share printers connected to this system
- using protocols DNSSD & CUPS
- restrict sharing to "Local Network"
- could also be set as IP address eg 192.168.0.0/24
- Allow remote administration
It is inadvisable to enable
- Allow printing from the Internet*print via network
then click "Change Settings" button to save any changes, if necessary
Then click on the "Manage Printers" button in the same tab, select the relevant printer and pull down the "Administration" menu
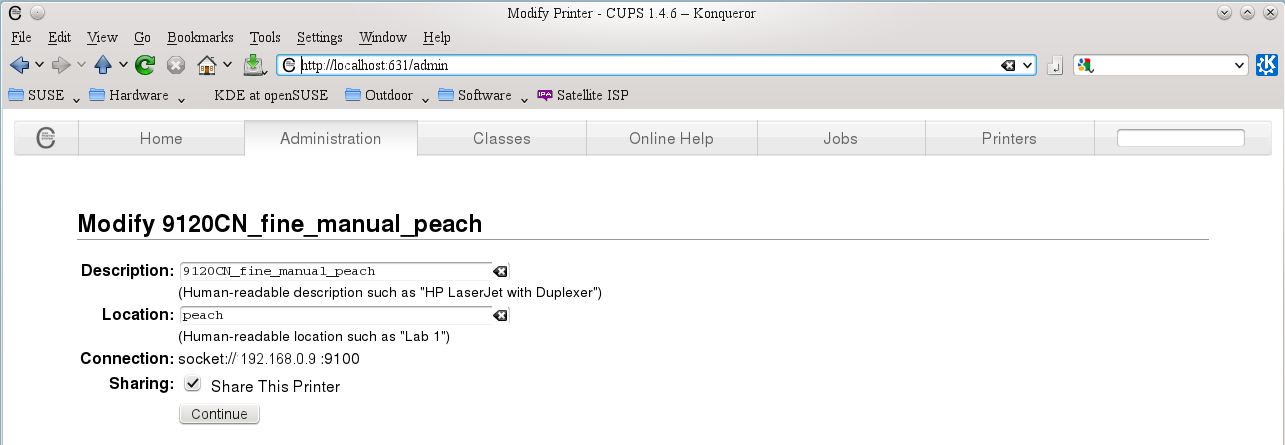
- select "modify printer" then click the "continue" button to proceed to its second screen
- ensure that "share this printer" is checked
- it will be helpful to make the "Location" the name of the computer controlling this printer
- click "continue" until the process completes
- does not require a web browser, which might not be present on a server
Quicktest
Both computers must be connecting to the local LAN via wired or wireless interface. A quick test is to start a web browser and check that the Internet is accessible. Provided that network access is working:
- Start a text editor (kate, leafpad etc)
- if the application is already running then it may need to be shutdown and restarted to recognize newly available printers
- Open a new document and type a few words
- From the file menu, select "Print"
- Select the relevant printer from the drop-down dialog
- which should list all shared printers on the LAN
- click on the properties/settings button
- ensure that the key settings are suitable eg A4 paper size, portrait orientation
- click OK/print
Working Environments
The following client systems automatically discover network printers, from default configurations
- Linux Mint 17.3 Mate
Preliminary Troubleshooting
1. No printers listed in the print dialog
This problem frequently is the result of a firewall running on one or both computers. Network printing can work only if either:
- firewalls on each computer allow port 631 through or
- Ethernet zones are set as "trusted/internal" in the firewalls on each computer
Only printers powered up will appear in the list
- confirm that the relevant printer is powered on
- if it is attached to another PC via parallel or USB cable then that PC must also be powered on
- (it is not necessary to log in to the sharing PC)
2. Print Job accepted but no output on Printer
This can be a result of many possible causes. Some simple checks:
- is CUPS known to be installed and working on the computer from which the text was created ?.
- Can it print to some printer at its home base ?
- does a similar print job created on the server computer give output on the printer ?
3. Print Job rejected by Server
- possible permissions issue - check thehat:
- printer is set as "share this printer" on the server
- follow "modify this printer" dialog
- printer is set as "share this printer" on the server
- possibly incompatible CUPS verions
- most suitable arrangement is for all machines using CUPS #< 1.6
- achievable only by upgrading the complete OS
- a new version of the driver for each printer is required at the server end, to support PDF print jobs
- if a binary driver, from the manufacturer, was previously used, check whether a driver is now included in CUPS or, failing that, whether an updated driver can be obtained from the manufacturer
- following the upgrade, follow the "modify this printer" dialog for each printer and select the most recent PPD file.
- on older installations, it might be necessary to keep all machines at CUPS version #< 1.5.4
- most suitable arrangement is for all machines using CUPS #< 1.6
If all else fails, then the CUPS Administration page has a button "View Error Log". Text towards the end of that file may give some clues.
CUPS <= 1.5.4
With this version, a (different) CUPS browsing module is usually enabled by default. Simpler configuration changes usually suffice.
At the server end, browse to https://localhost:631/admin and activate radio buttons to:
- Share printers connected to this system
At the workstation/client end, browse to https://localhost:631/admin and activate radio button:
"Show printers shared by other systems"
then click "Change Settings" button to save any changes, if necessary
The troubleshooting tips for version 1.6 and above still apply
Getting Techhnical
As a general rule, the print server should have a version not earlier than the client
- Version 1.5 of CUPS is likely to produce a print job as a PDF file, whereas version 1.3 & 1.4 servers accept only PostScript files
The above changes can also be implemented via a combination of editing config files and commands via CLI.
At the server end:
- ensure that /etc/cups/cups-browsed.conf includes the statements
- BrowseRemoteProtocols DNSSD,CUPS
- BrowseProtocols DNSSD CUPS
- BrowseAllow 192.168.1.0/24 (or network address your LAN, if not this)
- Log to a terminal as root and execute:
# systemctl cups-browsed.service enable
# systemctl cups-browsed.service start
At the client end:
- ensure that /etc/cups/cups-browsed.conf includes the statements
- BrowseRemoteProtocols DNSSD,CUPS
- BrowseProtocols DNSSD CUPS
- BrowseAllow 192.168.1.0/24 (or network address your LAN, if not this)
- Log to a terminal as root and execute:
# systemctl cups-browsed.service enable
# systemctl cups-browsed.service start
Save changes
It will then be necessary to use the Admin tab and select "manage printers" -> "Modify Printer", then modify each printer to == Situation ==be shared by ticking the box "Share this Printer"
Often the above steps suffice to make printers visible to a client machine. If not, then the following additional steps might be required, at the client end: Use "Control Panel" to set the following, if available (exact terminology will vary):
- print via network
- allow printing to local network only eg 192.168.0.0/24, for non-portable machines
Getting Techhnical
The above changes can also be implemented via a combination of editing config files and commands via CLI.
At the server end:
- ensure that /etc/cups/cups-browsed.conf includes the statements
- BrowseRemoteProtocols DNSSD,CUPS
- BrowseProtocols DNSSD CUPS
- BrowseAllow 192.168.1.0/24 (or network address your LAN, if not this)
- Log to a terminal as root and execute:
# systemctl cups-browsed.service enable 2
# systemctl cups-browsed.service start
At the client end:
- ensure that /etc/cups/cups-browsed.conf includes the statements
- BrowseRemoteProtocols DNSSD,CUPS2
- BrowseProtocols DNSSD CUPS
- BrowseAllow 192.168.1.0/24 (or network address your LAN, if not this)
- Log to a terminal as root and execute:
# systemctl cups-browsed.service enable
# systemctl cups-browsed.service start
Strictly for Geeks
Bootable Media
USB
USB devices either "thumb" drives or card readers, usually for SD or microSD cards, have several advantages for booting OS:
- generally much faster than DVD
- bootable from UEFI firmware, whereas DVD might not be
- higher capacity
- reusable
Special techniques are required to prepare bootable USB devices.
For General Users
if the ISO image has been prepared as an isohybrid, then the following tools can readily put it on USB device:
- http://wiki.rosalab.com/en/index.php/ROSA_ImageWriter
- this tool is also available for MacOS and Windows
- https://en.opensuse.org/SDB:Live_USB_stick#Using_SUSE_Studio_Image_Writer
A previously popular tool was "unetbootin". However this breaks isohybrids and should be used only with non-hybridised ISO.
Getting Techhnical
It is now possible to put multiple bootable OS on a single USB device and then boot any from UEFI or non-UEFI firmware. This requires working knowledge of the boot parameters as well as running a number of command line programs. Detailed instructions are at:
---[[-Rpeters 18:02, 18 August 2012 (EST)]]
--Rod 09:05, 7 October 2013 (EST) --
